Tools for Making Videos
Video is an incredibly effective format for delivering blended learning. There are lots of reasons for creating video and many different formats to choose from.
This post will give you some ideas of easy-to-use tools you can use to make videos.

Video works really well for:
- introducing yourself
- delivering lecture content
- explaining concepts
- demonstrating systems and software
- giving feedback
- prompting discussions
There are many ways to create video:
- speaking in front of a camera
- interviewing someone
- screencasting -
- talking to PowerPoint slides
- showing some software
- discussing an article or piece of student work
- creating animations
General Principles
There are a few general principles that will help you make great videos.
- Keep it short - long videos are harder to make and are daunting for viewers who can quickly lose interest. Try to split or chunk your material into smaller bite-sized videos.
- The quality of sound matters - speech carries most of the information in a video. Speak clearly and make sure it is recorded well. Poor equipment or noisy environments can contribute to poor sound quality.
- Lighting - if using a camera or webcam, position yourself so you are well lit. Avoid strong light sources behind you e.g. windows. For more information see the article on lighting
- Framing - if using a camera/webcam, make sure you or your subject fit comfortably in the frame.
- Background - if using a camera/webcam, check what's in the background. Objects in the background can be distracting, look odd or messy.
Where to put your videos
Regardless of how you make your video, if you intend using video in Blackboard or to an external audience, the best place to publish to is Kaltura. Kaltura has a strong integration with Blackboard and options for publishing externally.
Making Screencasts
An easy option for creating video is the screencast.
A screencast is where you use a piece of software to record yourself speaking alongside whatever is on your screen. This could be a PowerPoint, some software, student's work - anything on your screen.
There are lots of software for making screencasts e.g. Quicktime, Camtasia, Screencast-o-matic, but the University has one built right into the Kaltura media hosting platform called Kaltura Capture.
Kaltura Capture is a little piece of software for PC and Mac that lets you record any combination of your:
- Screen
- webcam
- microphone
This video shows you how to use the Kaltura Capture tool:
Speaking to Camera
If you want to record yourself speaking to camera, there are a few ways you can do this.
If you have a webcam, you can use the Kaltura Capture application as above.
If you have a good quality smartphone or iPad, you could try using that. The trick here is to elevate your device to eye-level - you could balance it on a pile of books, or spend some time crafting a home-made tripod!
If you have access to a video camera and tripod you can use that.
Whatever method you choose, the same principles around lighting, sound etc applies.
Interviewing
Interviewing someone is a really good way to tap into their knowledge and expertise and can make for interesting viewing.
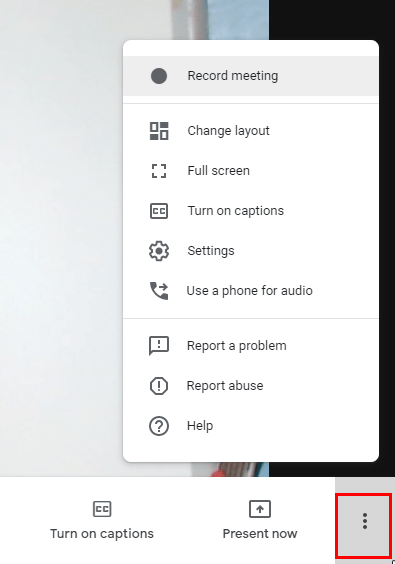
While we're socially distancing, it's still easy to conduct an interview online. Google Meet is an excellent tool for conducting meetings online and recording them. You'll find the record button in the menu like this:
When you've finished recording, you'll get an email giving you the location for the video file in Google Drive. You can download this and re-upload to Kaltura.
Recording an interview face-to-face can be a little more complex if you want to use a video camera and microphone - which is too much to explain in this post.
But it doesn't have to be that complicated - you can use a mobile phone or iPad!
Animation and beyond
Creating simple but effective animations is possible. There are lots of applications that can help you with this. They may not look professional and some of the software can be limiting - either by lack of features or your own abilities - but nevertheless your animations can be effective.
A good place to start is with a storyboard. Sit down and sketch out your ideas onto paper. Think about each idea or point you want to make and how you want the animation to illustrate this. Try to keep things really simple!
Within your animation, think about how you might use different elements like your voice narration, images, text and icons.
Next, have a look at the different systems available and what kinds of things you can (and can't) do with them. Decide on which application you'd like to use.
Here's a selection of options:
Powtoon is an online animation app. There is a free version, but this has some limitations e.g. water-marking, 3 minute HD limit, limited library of images. Powtoon lets you mix together characters, images and audio to build simple animations.
Biteable is another online animation app. I haven't tried this yet, but it shows you what you can find by Googling!
Adobe Spark Video is more for creating multimedia slide-based videos. It's very easy-to-use and videos are stylistic. It works online and on iPad.
Adobe Character Animator is part of the Adobe CC suite, Character animator lets you animate and voice "puppets" in real time using your webcam.