Building a website using Eleventy
This post builds on my previous tutorial about making a very basic page using Eleventy.
To recap, in the basic tutorial we:
- Created a project directory
- Created an
eleventy.config.jsfile, specifying the input and output directories - Initialised the project with npx to create a
package.jsonfile - Created the _src input directory to write our code in
- Installed Eleventy
- Created a homepage
index.md - Built the site
- Start the server with
npx eleventy --serve
To extend this, I'll cover:
- Adding additional directories for template files, images, CSS, data etc
- Passthrough, for static files like images and CSS that don't need processing
- Setting up a script to start the server
- Defining Nunjucks as the templating engine
- Adding site data
- Front Matter
- Defining and building layouts
More directories
In the _src folder, the create directories:
_src
├── images
├── _includes
      ├── layouts
      ├── partials
├── data
├── css
├── js
├── pages
Directories images, css, js and pages are self-explanitary!
The _includes directory contains all the files that we will use to build the site; think of these as all the template files.
The data directory, is where we will add data.
Passthrough
Now, Eleventy will automatically build the site from files within the includes and data directories, but won't touch the images, css and js. For this we need to set up passthrough so that Eleventy just copies anything in these directories to the corresponding output directories.
Edit eleventy.config.js and add the following to the eleventyConfig function:
  eleventyConfig.addPassthroughCopy("./_src/images");
  eleventyConfig.addPassthroughCopy("./_src/js/");
  eleventyConfig.addPassthroughCopy("./_src/css/");
So that it looks like this:
module.exports = function(eleventyConfig) {

  eleventyConfig.addPassthroughCopy("./_src/images");
  eleventyConfig.addPassthroughCopy("./_src/js/");
  eleventyConfig.addPassthroughCopy("./_src/css/");

  return {
    dir: {
      input: "_src",
      output: "_dist"
    }
  }
};
Setting up a script
This is optional, but if you want a shorter way to start the server than npx eleventy --serve you can set up a script in your package.json file.
In the scripts section you will see this:
"scripts": {
    "test": "echo \"Error: no test specified\" && exit 1"
  },
Replace it with:
"scripts": {
  "start": "npx eleventy --serve"
},
Now, every time you want to start the server, just use:
npm startTemplating with Nunjucks
Eleventy uses the Nunjucks templating language.
This needs to be set up in eleveny.config.js so that we can use html and markdown files.
in eleventy.config.js after return { add in:
markdownTemplateEngine: 'njk',
dataTemplateEngine: 'njk',
htmlTemplateEngine: 'njk',
So you now have:
module.exports = function(eleventyConfig) {

  eleventyConfig.addPassthroughCopy("./_src/images");
  eleventyConfig.addPassthroughCopy("./_src/js/");
  eleventyConfig.addPassthroughCopy("./_src/css/");

  return {
	markdownTemplateEngine: 'njk',
	dataTemplateEngine: 'njk',
	htmlTemplateEngine: 'njk',

    dir: {
      input: "_src",
      output: "_dist"
    }
  }
};
Basic data
Create the file _src/_data/site.json. We can define some basic data for the whole site here. Add in:
{
  "name": "My Most Excellent Website"
}
Front Matter
We can now start to add some structure to our web pages and use some HTML.
Before we do that, we need to look at front matter which is where we can add in the properties of page (a piece of content), including specifying which template files it should use to build itself.
Edit the file _src/index.md so that it looks like this:
---
title: 'My not-so basic website'
layout: 'layouts/home.html'
---

## Things are getting a little more advanced.

This is the homepage.
The stuff at the top between the --- lines is the front matter and sets out the properties of the document:
- title: this is the title of the page
- layout: this defines the HTML file will be used to build the page
We can put more stuff in here, like date, author, tags, and even specifying the path and alt description for a featured image. But we will leave this for now.
Building layouts
So far our site consists of a markdown file, but there's no HTML or CSS to define the design or structure. There's no style, header, menu, content, footer etc.
Our layout files will do this job for us. The layout files are HTML files that contain everything you'd expect in an HTML file, and they essentially "wrap around" our content.
For flexibility and ease, the layout files can be broken up into fragments and pieced together (included) on when Eleventy builds our site E.g. we might have the navigation inside a file called nav.njk, the footer in footer.njk and the content of the homepage inside home.html.
We can also have different layouts for different kinds of pages e.g. if we wanted to do simething different with the homepage than with the post pages, we just use a different layout.
After adding your front matter to index.md, if your server is running, you will notice an error after saving your md file, telling your that layouts/home.html doesn't exist. So, let's create it.
Create and edit the file _src/_includes/layouts/home.html and add in:
{% extends "layouts/base.html" %}

{% block content %}
<article>
{{ content | safe }}
</article>
{% endblock %}- extends "layouts/base.html" means that
home.htmlgetsbase.htmlwrapped around it - the block content specifies where
base.htmlgets wrapped aroundindex.md
The home.html file isn't a full HTML page, but just a bit of one: it's the bit that will display the contents of the homepage. It won't conatin the base HTML or the header, navigation or footer.
Also create the file _src/_includes/layouts/base.html.
We can work on Base:
<!DOCTYPE html>
<html>
<head>
<title>{{ title }} | {{ site.name }}</title>
<meta charset="UTF-8">
<meta name="viewport" content="width=device-width, initial-scale=1">
</head>
<body>

    {% include "partials/nav.njk" %}

    {% block content %}{% endblock %}

    {% include 'partials/footer.njk' %}

</body>
</html>
Let's look at the weird stuff in curly brackets:
title: This will display the title defined in the front matter of the markdown page
site.name: this is extracting and displaying data from the json file
data/site.json, so the site's name "My Most Excellent Website"include "partials/nav.njk": is going to place the html in the yet-to-be-created file nav.njk (we can use either html or njk files)
block content: ultimately, is going to place the content from the page we are viewing,
index.md, which in turn referenceshome.htmlinclude 'partials/footer.njk': is going to place the html in the yet-to-be-created file footer.njk
With partials we can split the html code into more managable chunks.
You'll notice that the site isn't quite working yet and you'll be getting errors if trying to serve. Just create all the referenced files e.g.
_includes/partials/nav.njk_includes/partials/footer.njk
In nav.njk:
<nav>
Here's the Navigation
</nav>
In footer.njk:
<footer>
Here's the footer
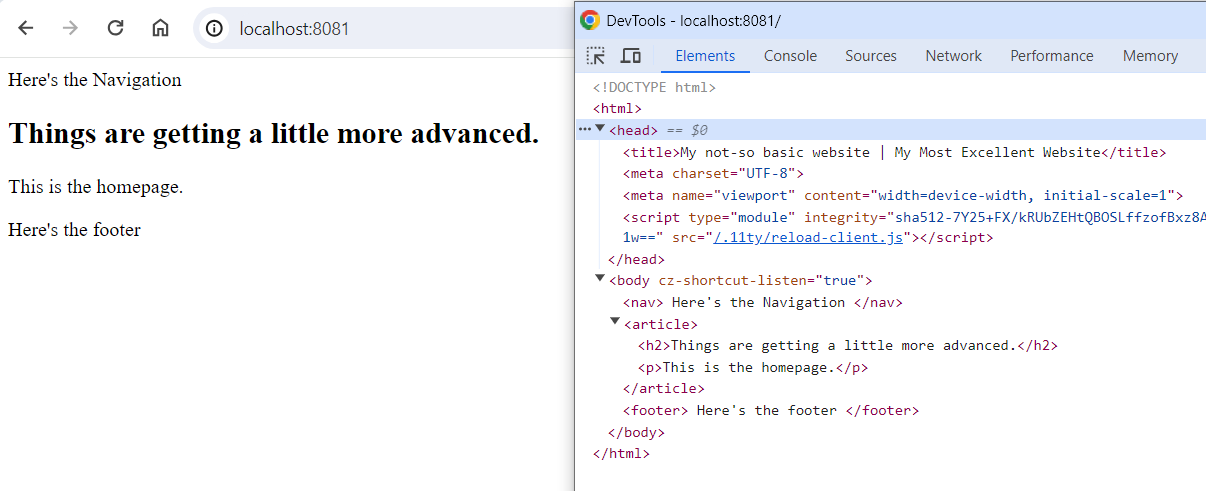
</footer>You now have the building blocks of a basic page.
Looking at the elements in Dev tools, you will see the structure as laid out in all the layout and partials files:
Adding design with CSS
For this section, we are going to connect the W3.CSS framework as it's quite a simple CSS framework to use.
All we need to do is link to the W3CSS CSS in the head of our HTML. In base.html, add this to head:
<link rel="stylesheet" href="https://www.w3schools.com/w3css/4/w3.css">head should now look like this:
<head>
<title>Building a website using Eleventy | TEL@Education</title>
<meta charset="UTF-8">
<meta name="viewport" content="width=device-width, initial-scale=1">
<link rel="stylesheet" href="https://www.w3schools.com/w3css/4/w3.css">
</head>
You should now see the font has changed in your basic page.
Let's also create a custom CSS file that we can add our own styles to if needed.
Create a new file custom.css inside the directory _src/css. Then link that also in head after the w3.css:
<link rel="stylesheet" href="{{ '/css/custom.css' | url }}">