Developing WebVR using A-frame
A-Frame is a web framework for building 3D/AR/VR experiences. In this post, I'll explain how I use it and walk through the development environment that I use.
There are a few tools that you'll need:
- A code editor. I use Atom.
- Access to Terminal. I use Ubuntu for Windows 10, but you can use Windows Terminal or on Mac, the built-in Terminal .
And that's it, really! The rest is done in either the code you write or by installing packages with Terminal*.
*So what is Terminal?
It's a command-line interface that allows you to do stuff on your computer without using your graphical interface. I like to think of it as "pure" computing (or old-fashioned computing!).
You can see Windows Terminal below. It looks a bit like MS DOS, but it isn't!
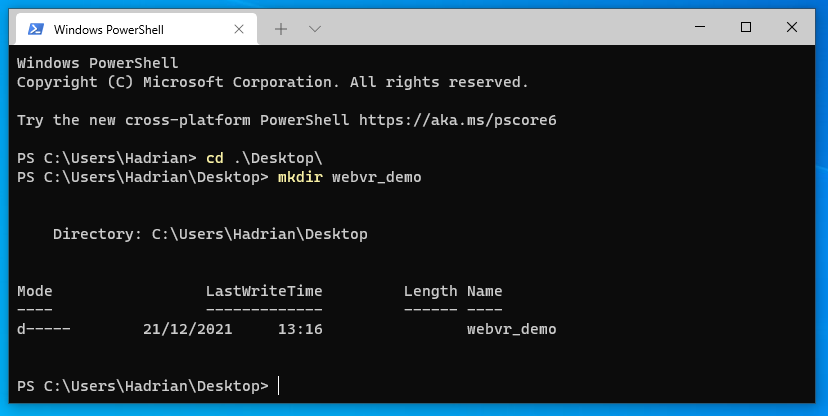
If you look at the commands I've written in Terminal above, I've changed directory (cd) to my Desktop, then I've made a new folder/directory (mkdir) called webvr_demo. This saved me from having to use the mouse, right clicking etc. Just think of the effort saved there, my mouse is like soooo heavy 😆
# To change directory
cd .\Desktop\

 #  To make directory
 mkdir webvr_demo
Creating a project and setting up the files
As you can see above, I've just created a folder on my desktop called webvr_demo. You can do this either in Terminal or the regular way you create folders.
Next, you need to create a HTML file inside of your project folder. There are many ways to do this, but here's how to do it with the Atom code editor:
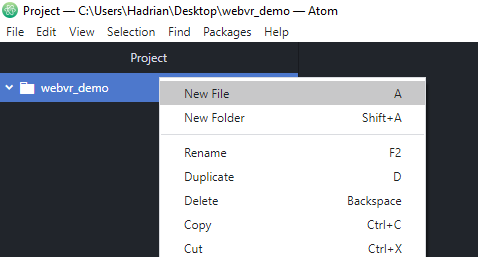
- Open up Atom, then go File > Add Project Folder. Choose your webvr_demo folder.
- In Atom, right click your root folder and choose new file
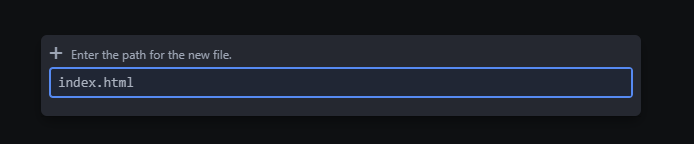
- Name your new file index.html
- In your index.html file, add some standard html - type html, then hit TAB to autofill

You'll see a blue dot in the html file's tab in Atom - this means it has not been saved. Save it.
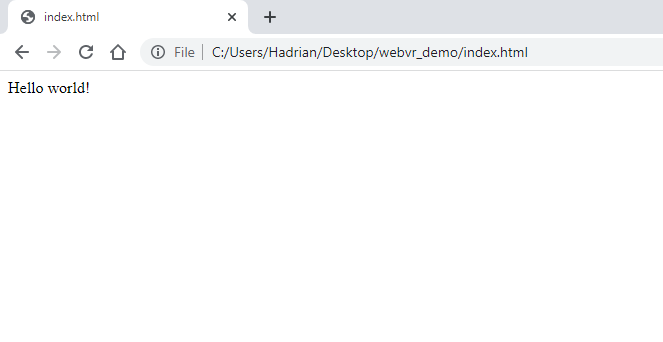
To make sure everything is working so far, just add some content into the html file, between <body> and </body> so your html looks like this:
<!DOCTYPE html>
<html lang="en" dir="ltr">
  <head>
    <meta charset="utf-8">
    <title></title>
  </head>
  <body>
    Hello world!
  </body>
</html>
Open up the HTML file in Google Chrome and you'll have a very dull looking web page!
Now, let's get rid of that, it's rubbish! Delete the HTML and paste in the following code:
<html>
<head>
<script src="https://aframe.io/releases/1.2.0/aframe.min.js"></script>
</head>
<body>
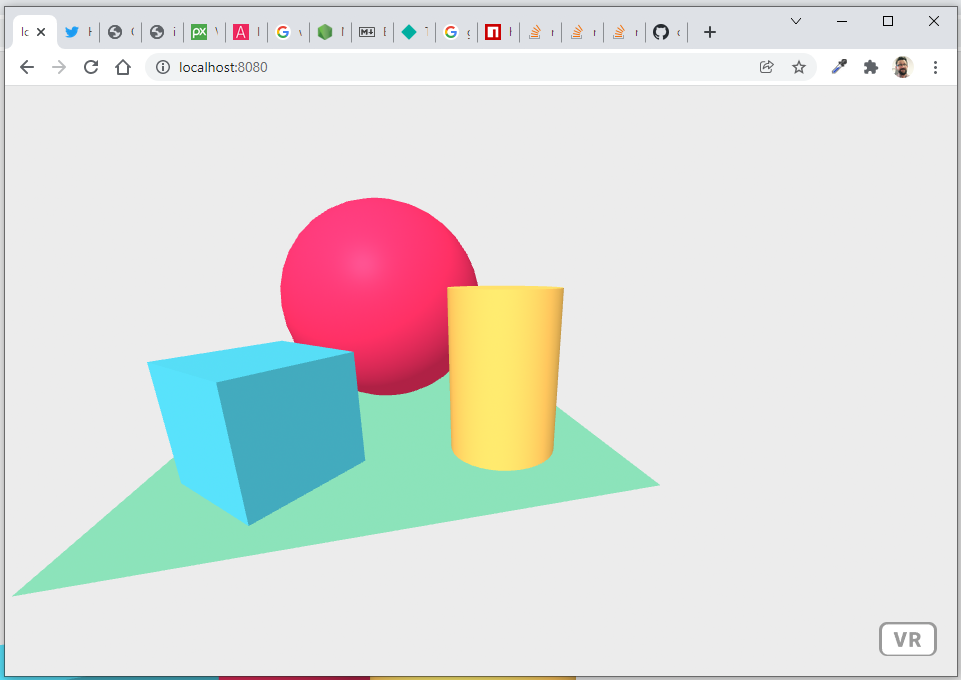
<a-scene>
<a-box position="-1 0.5 -3" rotation="0 45 0" color="#4CC3D9"></a-box>
<a-sphere position="0 1.25 -5" radius="1.25" color="#EF2D5E"></a-sphere>
<a-cylinder position="1 0.75 -3" radius="0.5" height="1.5" color="#FFC65D"></a-cylinder>
<a-plane position="0 0 -4" rotation="-90 0 0" width="4" height="4" color="#7BC8A4"></a-plane>
<a-sky color="#ECECEC"></a-sky>
</a-scene>
</body>
</html>That code is from https://aframe.io/docs/1.2.0/introduction/, where you'll find all the info about a-frame btw.
This adds in the a-frame Javascript:
<script src="https://aframe.io/releases/1.2.0/aframe.min.js"></script>and sets up a basic scene with various objects in it:
<a-scene>Now if you open your html file in your browser, it might work, or it might not! Opening local files in your browser isn't the right way to look at web pages under development as it isn't serving the page up properly and is likely to not work.
The next section goes through setting up a local server.
Setting up a local web server
This is where things get interesting/technical/ugly/scary.
I'm on Windows 10, so I'm going to switch to Ubuntu Terminal as this is what I'm used to. If you're on Mac, then regular terminal is fine.
Install node.js
Node JS is a Javascript runtime designed to create applications (whatever that means!). We need nodejs and npm (node package manager) so we can get ourselves a local web server up-and-running and install an a-frame addon called a-frame watcher (more later).
Installing nodejs on Ubuntu is very straightforward:
# update installation repositories
sudo apt update

# install Node JS
sudo apt install nodejs
Then once that's installed, to add npm:
sudo apt install npmIf using Windows without Ubuntu, you can download and install nodejs from the website which should install npm too.
On Mac, you can install from the nodejs website, by installing Homebrew and running the commands to install nodejs.
Install npm http-server
On Ubuntu 20.04 for Windows 10, the default node version seemed to be 10.19, while http-server required verion 12 or above. I managed to install node version 12 by referring to this page.
To install the web server, refer to this page https://www.npmjs.com/package/http-server.
Starting the webserver and going to http://localhost:8080 will serve up your basic VR app:
http-server will also give you an IP address that you ca use if you want to view your masterpiece on a VR headset or mobile phone!
Editing your VR app
Now you're up and running, you can go back to your index.html file in Atom and start making some changes.
Let's change some of the shapes and colours, starting with the box:
<a-box position="-1 0.5 -3" rotation="0 45 0" color="#4CC3D9"></a-box>You can see the box's colour is clearly defined as #4CC3D9. This is a Hex code and it's one of the ways we can define colours in HTML. There are endless resources for finding these colours, here's a good one from Adobe.
Find a new colour and replace the box's colour. Something like:
<a-box position="-1 0.5 -3" rotation="0 45 0" color="#BF6D4E">Then do the same for the other objects...
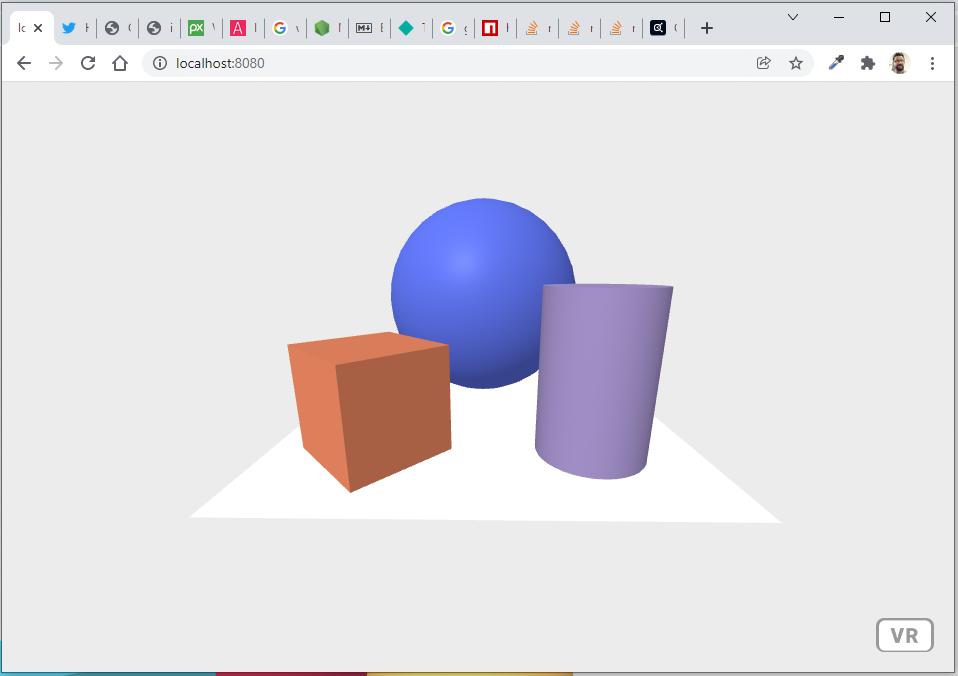
Now let's look at positions of the objects. The position values contain three numbers for positioning along the x, y and z axis. These values are in metres and with respect to the centre of the object:
- x extends right
- y extends up and
- z extends out of the screen towards you

For the box, we have
position="-1 0.5 -3"
which means the box's centre (with respect to the centre of the scene) is positioned:
- 1 metre left i.e. -1 metre right
- 1/2 a metre vertical (at y=0 it's centre point rests on the floor, so needs raising up by height/2 = 0.5, as it is 1m high)
- -3 metres away from us
Have a go at moving the objects around using their positional values. See if you can stack them on top of one another!
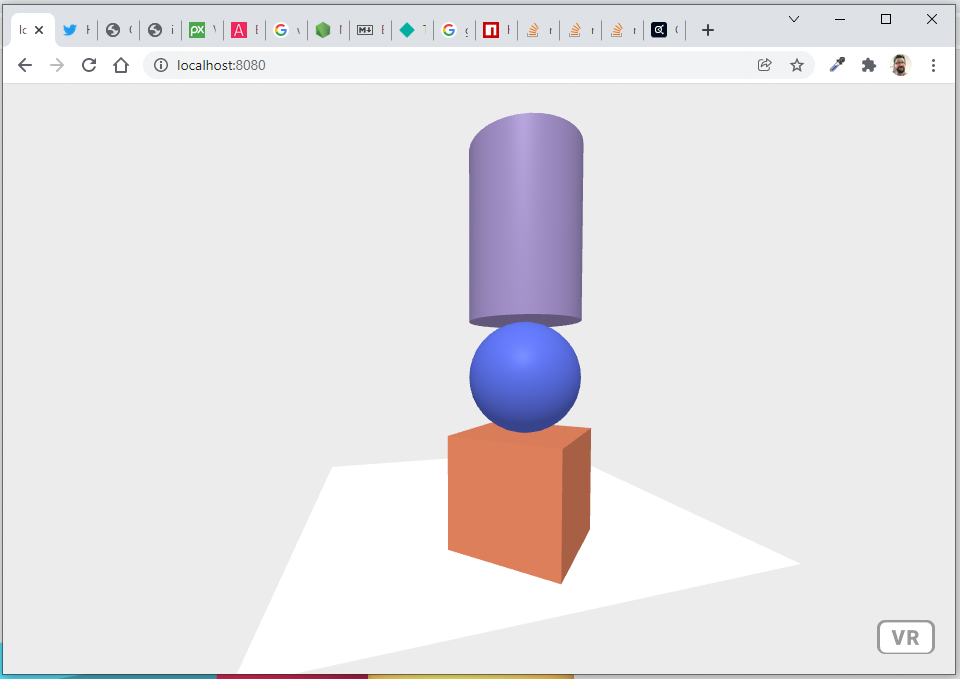
That's quite difficult isn't it!
Go go gadget arms!
In your browser press ctrl + alt + i. This brings up the scene inspector!
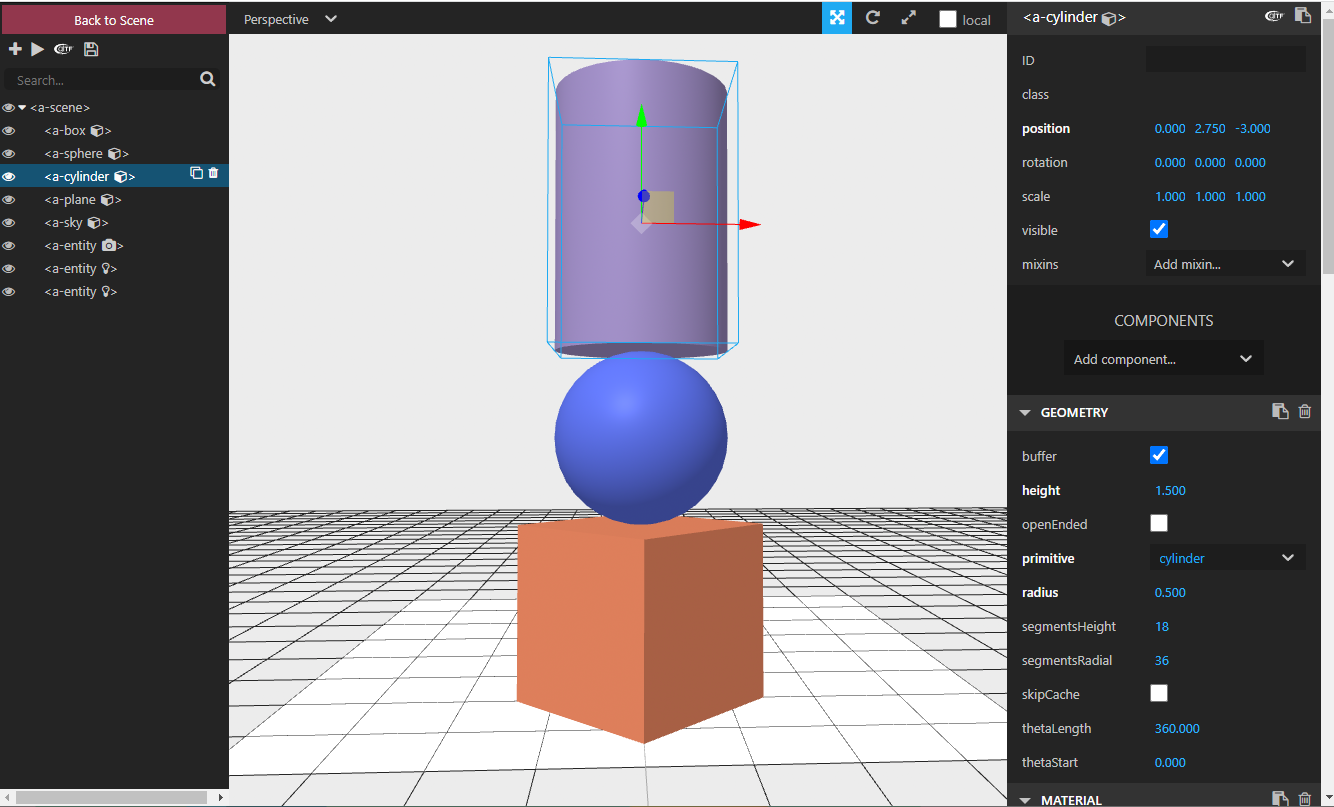
Woah! 💥
Down the left-hand side, you can select objects in your scene (use this rather than clicking the objects to select as you can often select the wrong thing!). With an object selected, you can use the red, green and blue handles to move it in 3D space.
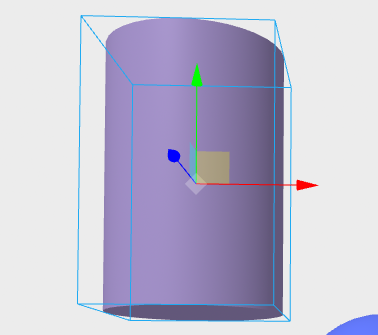
You'll also see on the right-hand panel, all the properties of the selected object.
Try moving an object and use the save icon at the top of the left-hand panel:
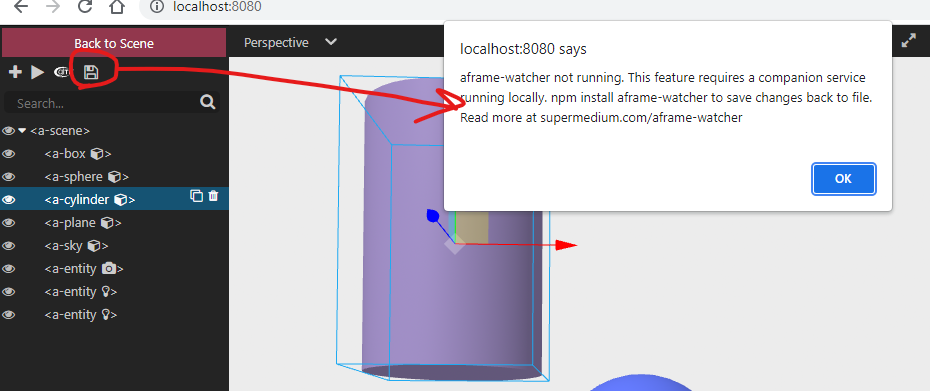
Oh no! 😧 Don't worry, we just need to install a-frame watcher to allow the browser to edit HTML files!
Installing a-frame watcher
A-frame watcher is installed via npm (you have that installed) and will enable changes made in the inspector to be written to your HTML files. That gives us a pretty good visual editor!
Instructions are in the link above, but here too:
In terminal, do
sudo npm install -g aframe-watcherThen launch aframe-watcher:
aframe-watcherNote you'll need to run two instances of Terminal to run http-server and aframe-watcher concurrently.
Using A-frame watcher
A-frame watcher only works if your objects have IDs. In your HTML, you need to give each object you wish to edit and ID, so it looks like this:
<a-box id="cube" position="-1.73722 0.5 -3" rotation="0 45 0" color="#BF6D4E"></a-box>
<a-sphere id="ball" position="0 1.5 -3" radius="0.5" color="#4B5CBF"></a-sphere>
<a-cylinder id="tube" position="0 2.75 -3" radius="0.5" height="1.5" color="#8677A6"></a-cylinder>
<a-plane id="floor" position="0 0 -4" rotation="-90 0 0" width="4" height="4" color="#F2F2F2"></a-plane>
<a-sky id="sky" color="#ECECEC"></a-sky>
You can see that each object has an ID for watcher to latch onto. The ID name is fairly arbitrary, you can name them as you see fit.
When saving in a-frame's inspector, keep an eye on the watcher terminal as it will ask you to allow the edits - just choose yes!
That's it! 🎉