Screencasting and other ways to make video
There are lots of ways you can use and make video to present your ideas. Here are some of those that are widely available to you at Sheffield.
Making a screencast
A screencast is a good way to convey your ideas through video. A screencast is where you record the contents of your screen along with your voice. This can be you delivering a PowerPoint presentation, or anything else that you can show on your screen while you talk e.g. demonstrating software, talking about an article or piece of work.
To make a screencast, you need software capable of recording your screen and sound. There are several softwares available, but everyone at the University has access to an application called Kaltura Capture, so we'll concentrate on that.
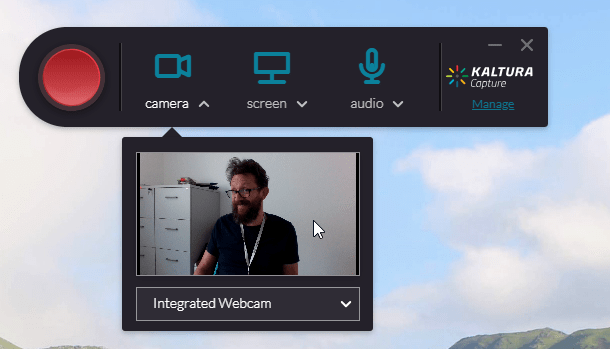
Kaltura Capture
Everyone at the University can access Kaltura Capture to make screencasts. It is a free app that accompanies the University's Kaltura media hosting system. You can install the app on your PC or Mac and that will let you record and upload your screencasts, and also submit them for assessment.
Kaltura capture also lets you record your webcam simultaneously. This is good if you want to show your viewers who you are. But ultimately, this is optional, and you can turn your webcam off when recording your screencast.
Tips and tricks - You don’t have to record your screencast in one go. Learn the keyboard shortcuts to pause and resume recording and you can strategically pause recording while you pause to gather your thoughts or just get ready for the next section.
Command/Ctrl + Shift + R = Pause/Resume Recording
Troubleshooting - Screencasting can be quite intensive computing-wise. If your computer struggles when trying to record a screencast, check the following:
- Close any unused applications - every application uses valuable memory, some more than others.
- Make sure you have plenty of hard drive space - Windows and MacOS need plenty of free space on the C: dive or system drive for healthy operation. If your drive is near to full, consider clearing some files. You need at least 10-20GB of free space, the more the better.
- The age and OS of your computer - Technology moves on and very old computers may not cope with modern activities like recording screens.
You can watch my video guide to using Kaltura Capture here:
Using Google Slides to record a video presentation
Google slides now has a feature that allows you to turn your presentation into a video. The video below explains how to do this:
Using PowerPoint to record a video presentation
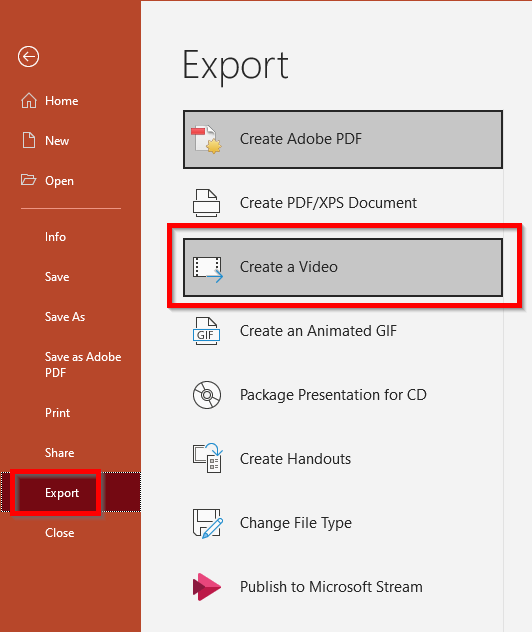
PowerPoint allows you to narrate each slide of your presentation then export your whole thing as a video file. This is good if you want to build up your presentation a slide at a time and take your time to get each slide right.
- Microsoft has an article on how to narrate your slides with an easy-to-follow video
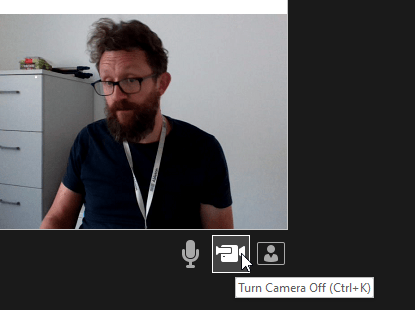
As with Kaltura Capture, you also have the option of recording your webcam along with your narration, or you can turn this off.
Once you have narrated all your slides, you can export this as a video file via the File > Export > Create a Video menu:
Now that you have a video version of your presentation, you can upload this to Kaltura's My Media where you can also submit it for assessment. See:
You can watch my screencast on how to create a video presentation in PowerPoint here:
The recording will be in Google Drive. If you need to put the video into Kaltura (My Media) you can then download it then upload to Kaltura/My Media.
Adobe Express Video
If you'd like to explore a more visual and creative way of making videos, you could try Adobe Express.
Adobe Express is an online tool that lets you create a variety of media types, including videos and narrated slides. It is extremely flexible and creative and allows you to combine images, AI genrated images, video, text, animation in a fun way.
Adobe Express is very easy to use and quite fun!